
Onyx table tops, backlit vanities & walls, stone feature walls, signage
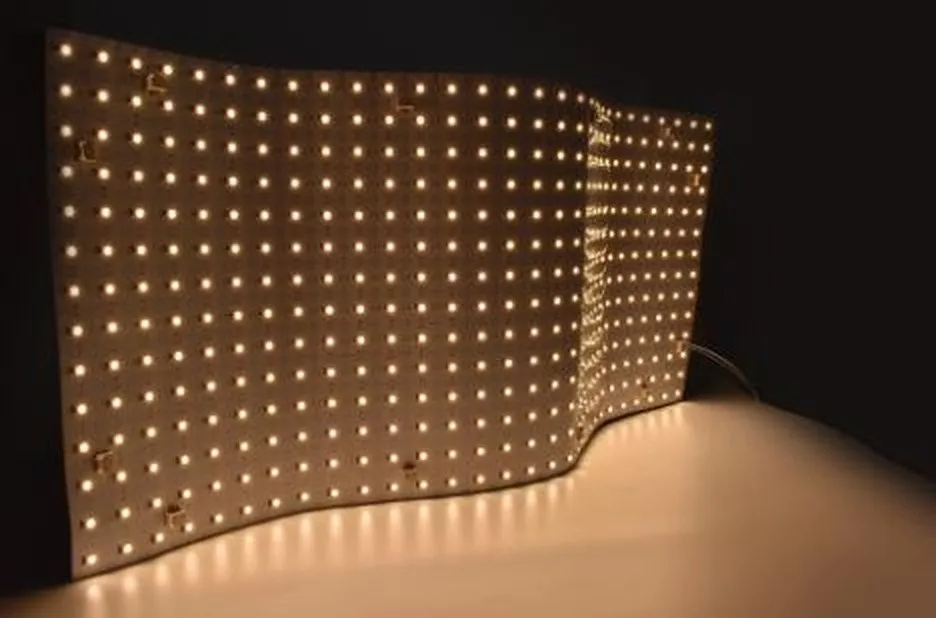 LED Sheet
 · 24V DC
LEDSHEET Flex LED Panel
LEDSHEET-420WW-[CCT]-24V
A flexible, energy-efficient LED panel for backlighting stone, onyx, glass and signage. Sheets can be cut with scissors to create custom shapes.
Power14 W per sheet or 5 W per sheet
Light output1,672 lm per sheet · 600 lm
CRIRa > 80
IP ratingIP20
Width503.1 × 235 × 6.5 mm
Cut everyScissors, along printed cut lines
Output
Colour temperature
Your Part NumberLEDSHEET-420WW-[CCT]-24V
CERoHS
Application Video
See It in Use
Backlit Onyx
LEDSHEET behind a translucent onyx slab on our display. The even grid of 420 LEDs per sheet gives spot-free light across the whole stone.
Specifications
Voltage
24V DC constant voltage
Power
14 W per sheet (standard) or 5 W per sheet (ambient)
Light output
1,672 lm per sheet (14 W) · 600 lm (5 W)
Colour temperature
2700K, 3000K (Warm White)
CRI
Ra > 80
IP rating
IP20 (indoor, dry)
LED type
420 × SMD2835 per sheet
Width
503.1 × 235 × 6.5 mm
Cut unit
Scissors, along printed cut lines
Reel length
Per sheet
Beam angle
120°
Bending
Gentle curves only; do not fold
Control & drivers
Max. 5 sheets per 96W driver output; accessory kit included
Certifications
CE · RoHS ·
Lifetime
30,000 h
Warranty
3 years
Operating temp.
-25 °C to 45 °C
Specifications from the DayTech LED cut sheet. Subject to change without notice.
| Part Number | Voltage | IP Rating | Colour | Length / Size | Power | Quote |
|---|---|---|---|---|---|---|
| LEDSHEET-420WW-2700K-24V | 24V DC | IP20 | 2700K | 503.1 × 235 mm | 14 W / sheet | |
| LEDSHEET-420WW-3000K-24V | 24V DC | IP20 | 3000K | 503.1 × 235 mm | 14 W / sheet | |
| LEDSHEET-420WW-2700K-24V-5W | 24V DC | IP20 | 2700K | 503.1 × 235 mm | 5 W / sheet | |
| LEDSHEET-420WW-3000K-24V-5W | 24V DC | IP20 | 3000K | 503.1 × 235 mm | 5 W / sheet |
Before you begin
- Switch off power at the breaker before installing, cutting or servicing any sheet.
- Power sheets only from a 24 V DC constant-voltage LED driver. Never connect a sheet directly to line voltage.
- Mains (line-voltage) wiring to the driver must be done by a qualified electrician to local electrical code.
- IP20: for indoor, dry locations only. Keep sheets away from water and direct moisture.
- Observe polarity (+ / −) on every connection. Reversed wiring will prevent the sheet from lighting.
- Flex sheets in gentle curves only; do not fold or crease them.
Installation steps
- 1Plan the layout and power
Work out how many sheets the area needs and where the driver will sit. Each 96 W driver output can power a maximum of 5 sheets. For 6 or more sheets, use another driver or driver output and split the sheets into separate circuits of 5 or fewer.
- 2Cut to size (optional)
Sheets can be trimmed with scissors to fit the space or create custom shapes. Cut only along the solid cut lines printed on the sheet; cutting anywhere else damages the circuit and that section will go dark.
- 3Prepare the surface
The surface must be clean, dry, smooth and free of dust, oil and grease. Wipe it with isopropyl alcohol and let it dry fully. Install at room temperature for the best adhesive bond.
- 4Mount the sheets
Peel the 3M adhesive backing and press the sheet firmly onto the surface, working from the centre out to remove air pockets. Where extra hold is needed, drill through the sheet and fix it with screws, avoiding the LEDs.
- 5Jump sheets together
Connect neighbouring sheets on the same circuit with the supplied jumpers: the 60 mm jumper where sheets butt together, the 150 mm jumper where there is a gap. Keep each circuit to 5 sheets or fewer.
- 6Connect power and test
Connect the power input cable to the first sheet and to the 24 V DC driver output, + to + and − to −. Once the driver’s mains side has been connected by a qualified electrician, restore power and check that every sheet lights evenly.
Wiring and power
- Never put more than 5 sheets on a single 96 W driver output, even if the driver has spare capacity. This keeps the voltage even across every sheet.
- Feed each circuit from its own driver output. Do not link the end of one 5-sheet circuit into the next.
- Sheets can be fed from one end, or from the centre to split a run in two directions. Either way, keep 5 sheets or fewer on each driver output.
- Keep low-voltage wiring runs short and use a wire gauge suited to the length to avoid voltage drop.
- Secure cables with the supplied cable management clips and keep them clear of sharp edges.
- Make sure the driver is accessible and ventilated; do not enclose it in insulation.
Supplied with each sheet
- Short jumpers, 60 mm cable (4 pcs) and long jumpers, 150 mm cable (4 pcs)
- Power input cables, 250 mm (2 pcs) and WAGO connectors (2 pcs)
- Cable management clips (4 pcs) and protective bumpers (8 pcs)
Troubleshooting
| Problem | Likely Cause | What to Do |
|---|---|---|
| Sheet does not light | No power, loose jumper or reversed polarity | Check the driver output, re-seat the jumpers, confirm + to + and − to − |
| Sheets dim toward the end of a run | Too many sheets on one output | Limit each circuit to 5 sheets; add a driver output |
| Section dark after trimming | Cut made off the solid line | Replace the section; trim only on the solid cut lines |
| Flickering | Driver overloaded or wrong driver type | Use a 24 V DC constant-voltage driver; reduce the load |
| Sheet lifting from the surface | Dusty, oily or textured surface | Clean with alcohol and re-apply, or add screws |
Full Installation Manual (PDF)
From the DayTech LED installation manual. Mains wiring to the driver must be done by a qualified electrician to local code.
Planning a Project with the LEDSHEET Flex LED Panel?
Tell us the lengths and layout and we'll quote the tape, channel, connectors and driver for each run.